03
Framer
Cursor-follow particles
Summary
Generate a grid of elements.
Animate each element based on cursor's distance and angle.
Calculate visual parameters dynamically.
01 / 05
Background
This demo has been lying dormant on my local drive for several months but finally, I managed to ship it! The concept of this Framer coded component is straightforward. It allows you to link it to a design element you've created in Framer, and it will generate a grid of these elements. These elements then produce a staggered animation that follow your cursor.
As your mouse navigates over the grid, each element computes its distance and angle from the cursor. Based on these computations, it animates its position, rotation, scale, opacity, and color.
This component is built to accommodate various use cases:
✅ 100% responsiveness.
✅ Adjustable grid properties.
✅ Customizable parameters (Transition, position, rotation, scale, opacity, color).
✅ Seamless integration with Framer's native features.
02 / 05
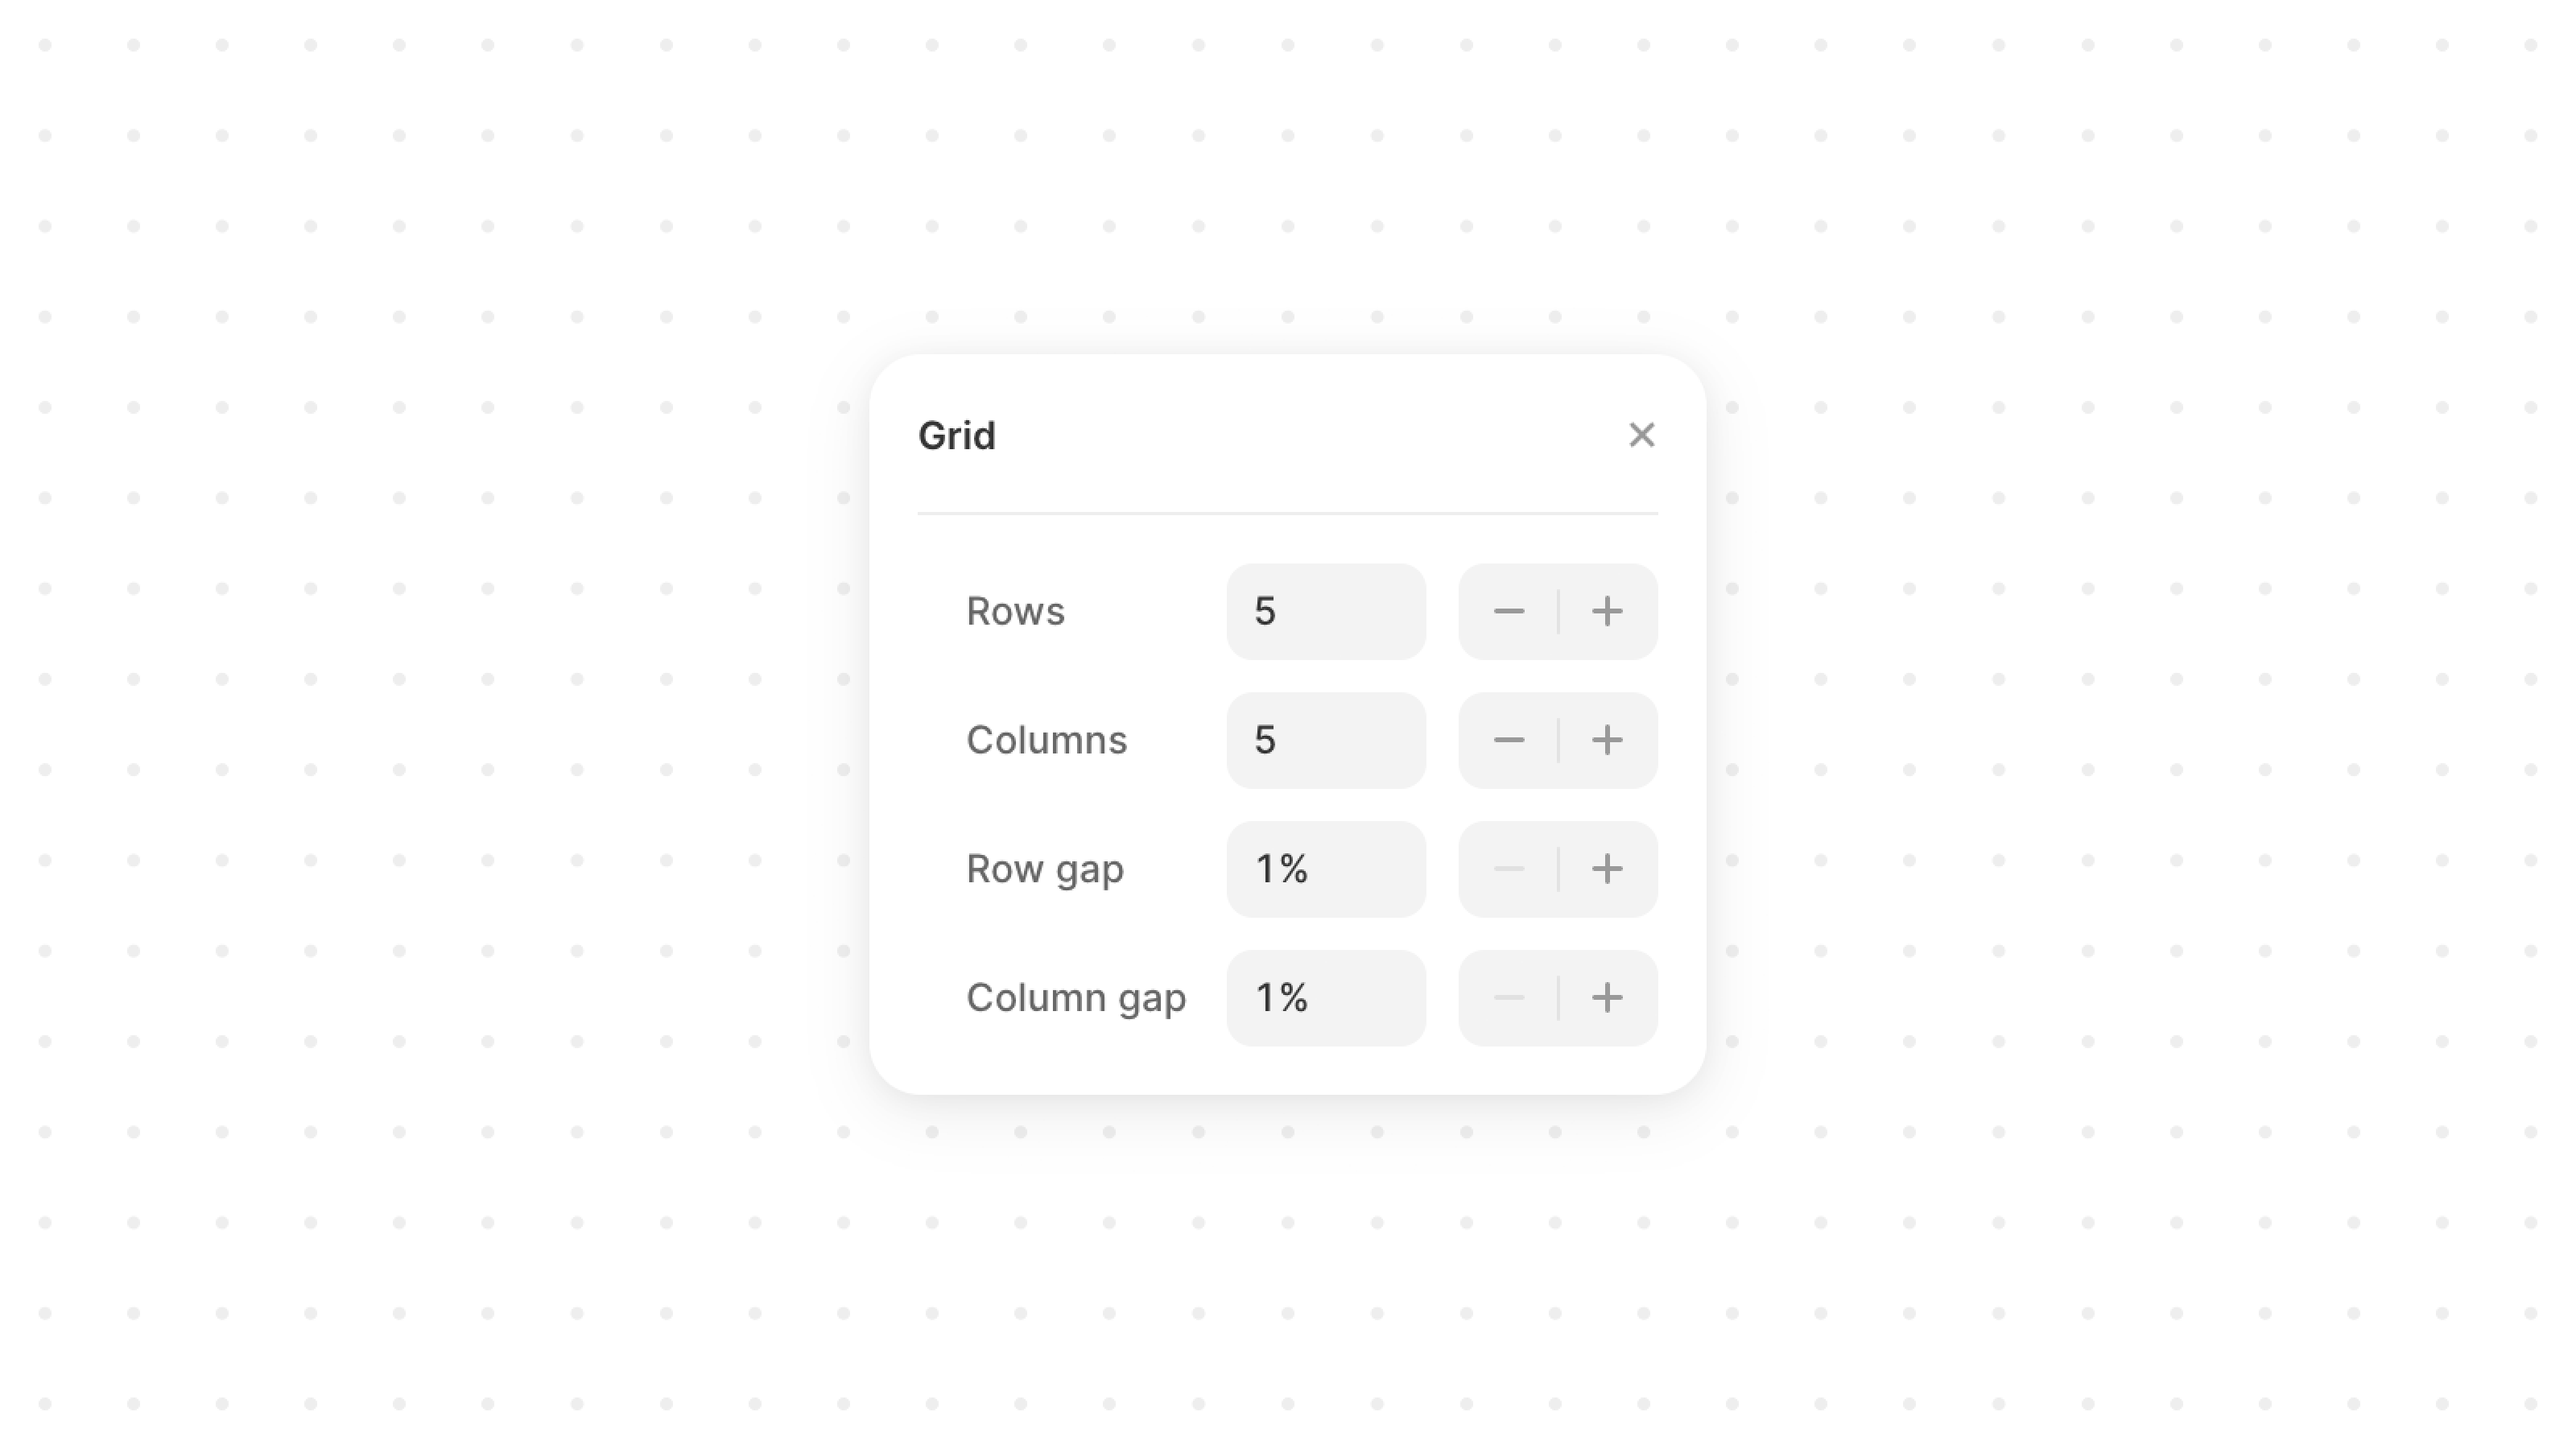
Grid structure
The grid for the particles is created using the CSS grid layout.
Structure of the grid is defined by
gridTemplateColumnsandgridTemplateRows.repeat()function is used to create a specific number of columns and rows.Each column and row occupies an equal fraction
1frof the available space.The gap (gutter) between rows and columns is set by
gridGap.
Through Framer, you can easily manage the grid properties using property controls. Additionally, you can effortlessly populate your grid with designs crafted in Framer, thanks to ControlType.ComponentInstance.
03 / 05
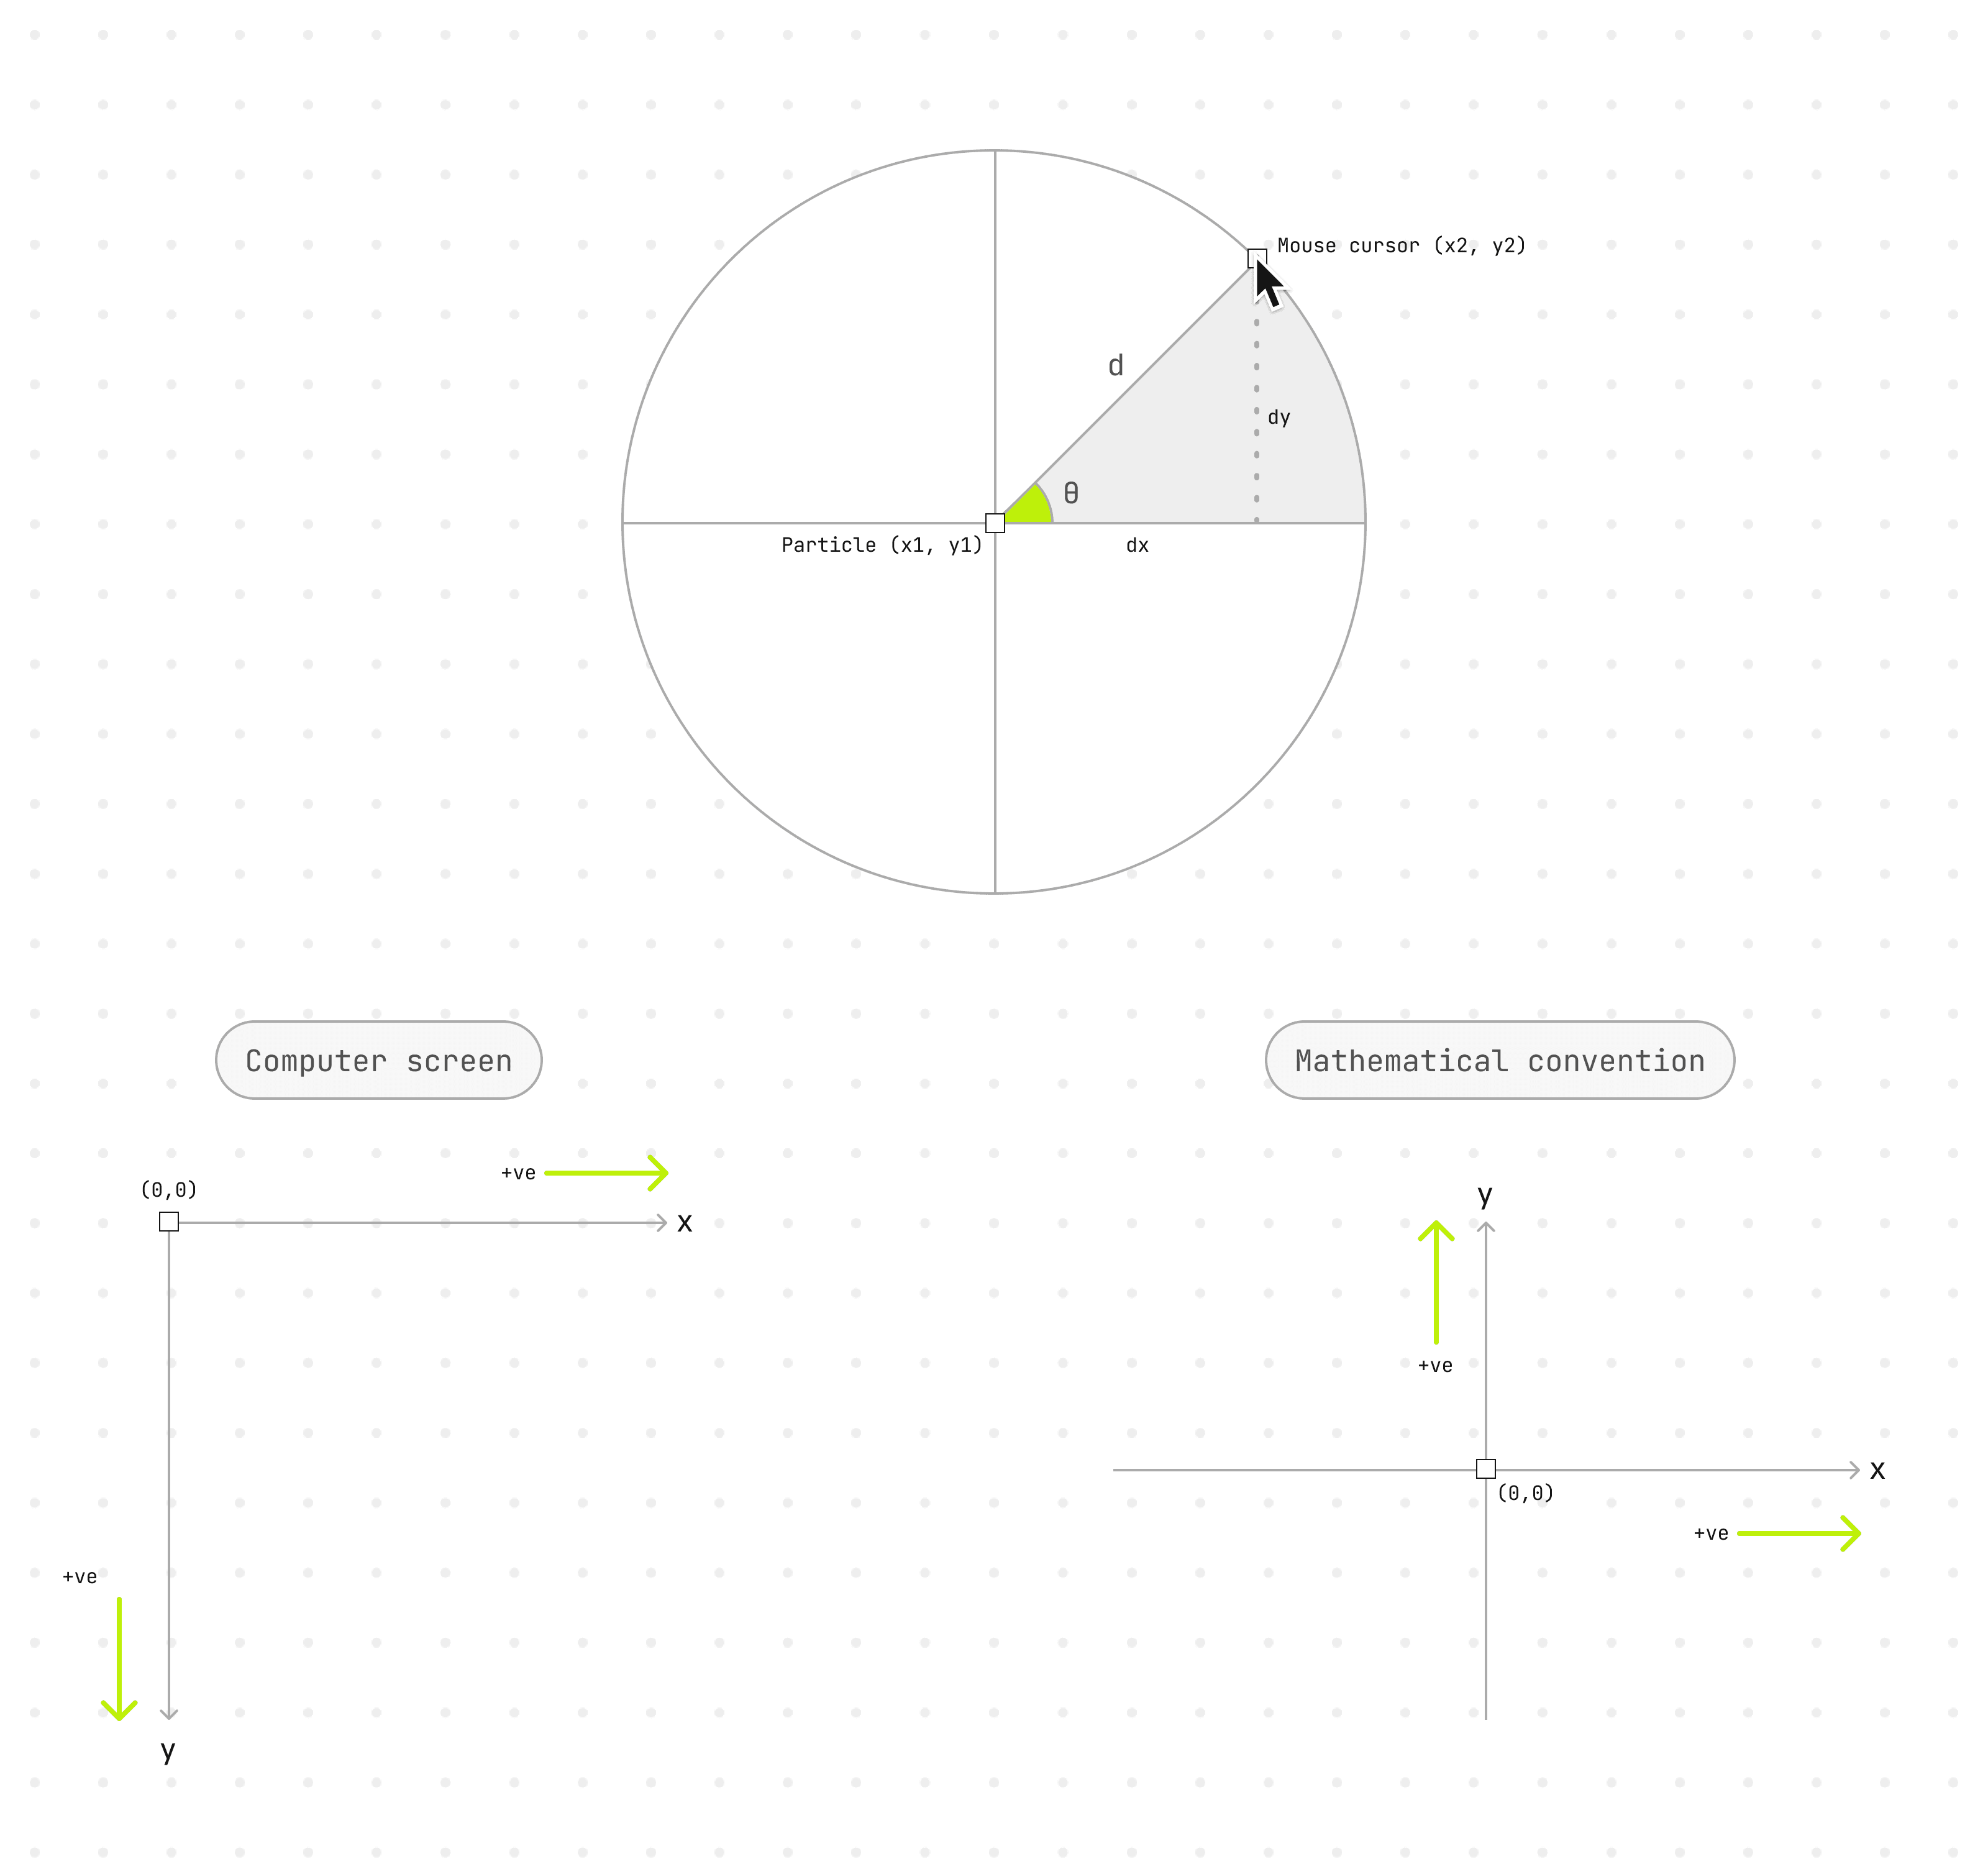
Angle and distance from the cursor
We need to devise a function that calculates the animation values for each particle element based on the mouse cursor's position. This is crucial in determining the particle's direction of movement, rotation angle, distance, scale, opacity, and color. These calculated values can then be applied to animate the particle, giving rise to an effect where particles respond to the cursor's movements.
Here's the detailed explanation:
This function takes in the cursor's x and y coordinates
cursorXandcursorYand the particle's x and y coordinateselXandelY. It uses these to calculate the differences in x and y coordinates between the cursor and the particledxanddy. These differences in coordinates help determine the direction of the particle's movement.
The angle between the cursor and the particle is calculated using the
Math.atan2function, which returns the angle in radians. This is then converted into degrees. However, since the y-coordinates in the screen's coordinate system increase from top to bottom, which is contrary to the standard mathematical convention,-dyis used instead ofdyto invert the y-axis direction. The distance between the cursor and the particle is calculated using the Pythagorean theorem.
04 / 05
Calculate the visual parameters
Scale and opacity
The scale and opacity are determined by the distance between the cursor and the particle. We can enhance the effect by defining a few properties that influence the visual parameters. These properties can then be adjusted through property controls.
Properties:
Radius= Range within which the particle's scale and opacity will be affected by the cursor's proximity. As the value increases, the impacted area expands.minScale= Smallest size for the particle.minOpacity= Lowest opacity for the particle.
Next, we calculate the ratio of the distance between the cursor and the particle. If the particle is at its maximum distance, this ratio will be 1.
We ensure the ratio never exceeds 1.
We then invert the ratio. If the particle is at its maximum distance, this will be 0. Essentially, the further away the particle is, the smaller and less opaque it becomes.
Finally, we ensure that the calculations do not fall below the minimum scale and opacity.
Color
The color is calculated by performing linear interpolation on the RGBA values between two colors, colorA and colorB, based on the distance of the particle from the cursor. The closer the particle is to the cursor, the closer the color will be to colorA.
The red, green, blue, and alpha (opacity) components of the interpolated color are calculated separately.
The interpolationFactor is a value between 0 to 1 that represents how far the particle is from the cursor.
When the interpolationFactor is 0, the particle is at the cursor, and this calculation returns the component of colorA. If the interpolationFactor is 1, the particle is at the maximum distance, and it returns the component of colorB. For values in between, it returns a mix of the two colors.
If we were to unpack this in a visualize way, taking an example on how the "R" part of a color works…
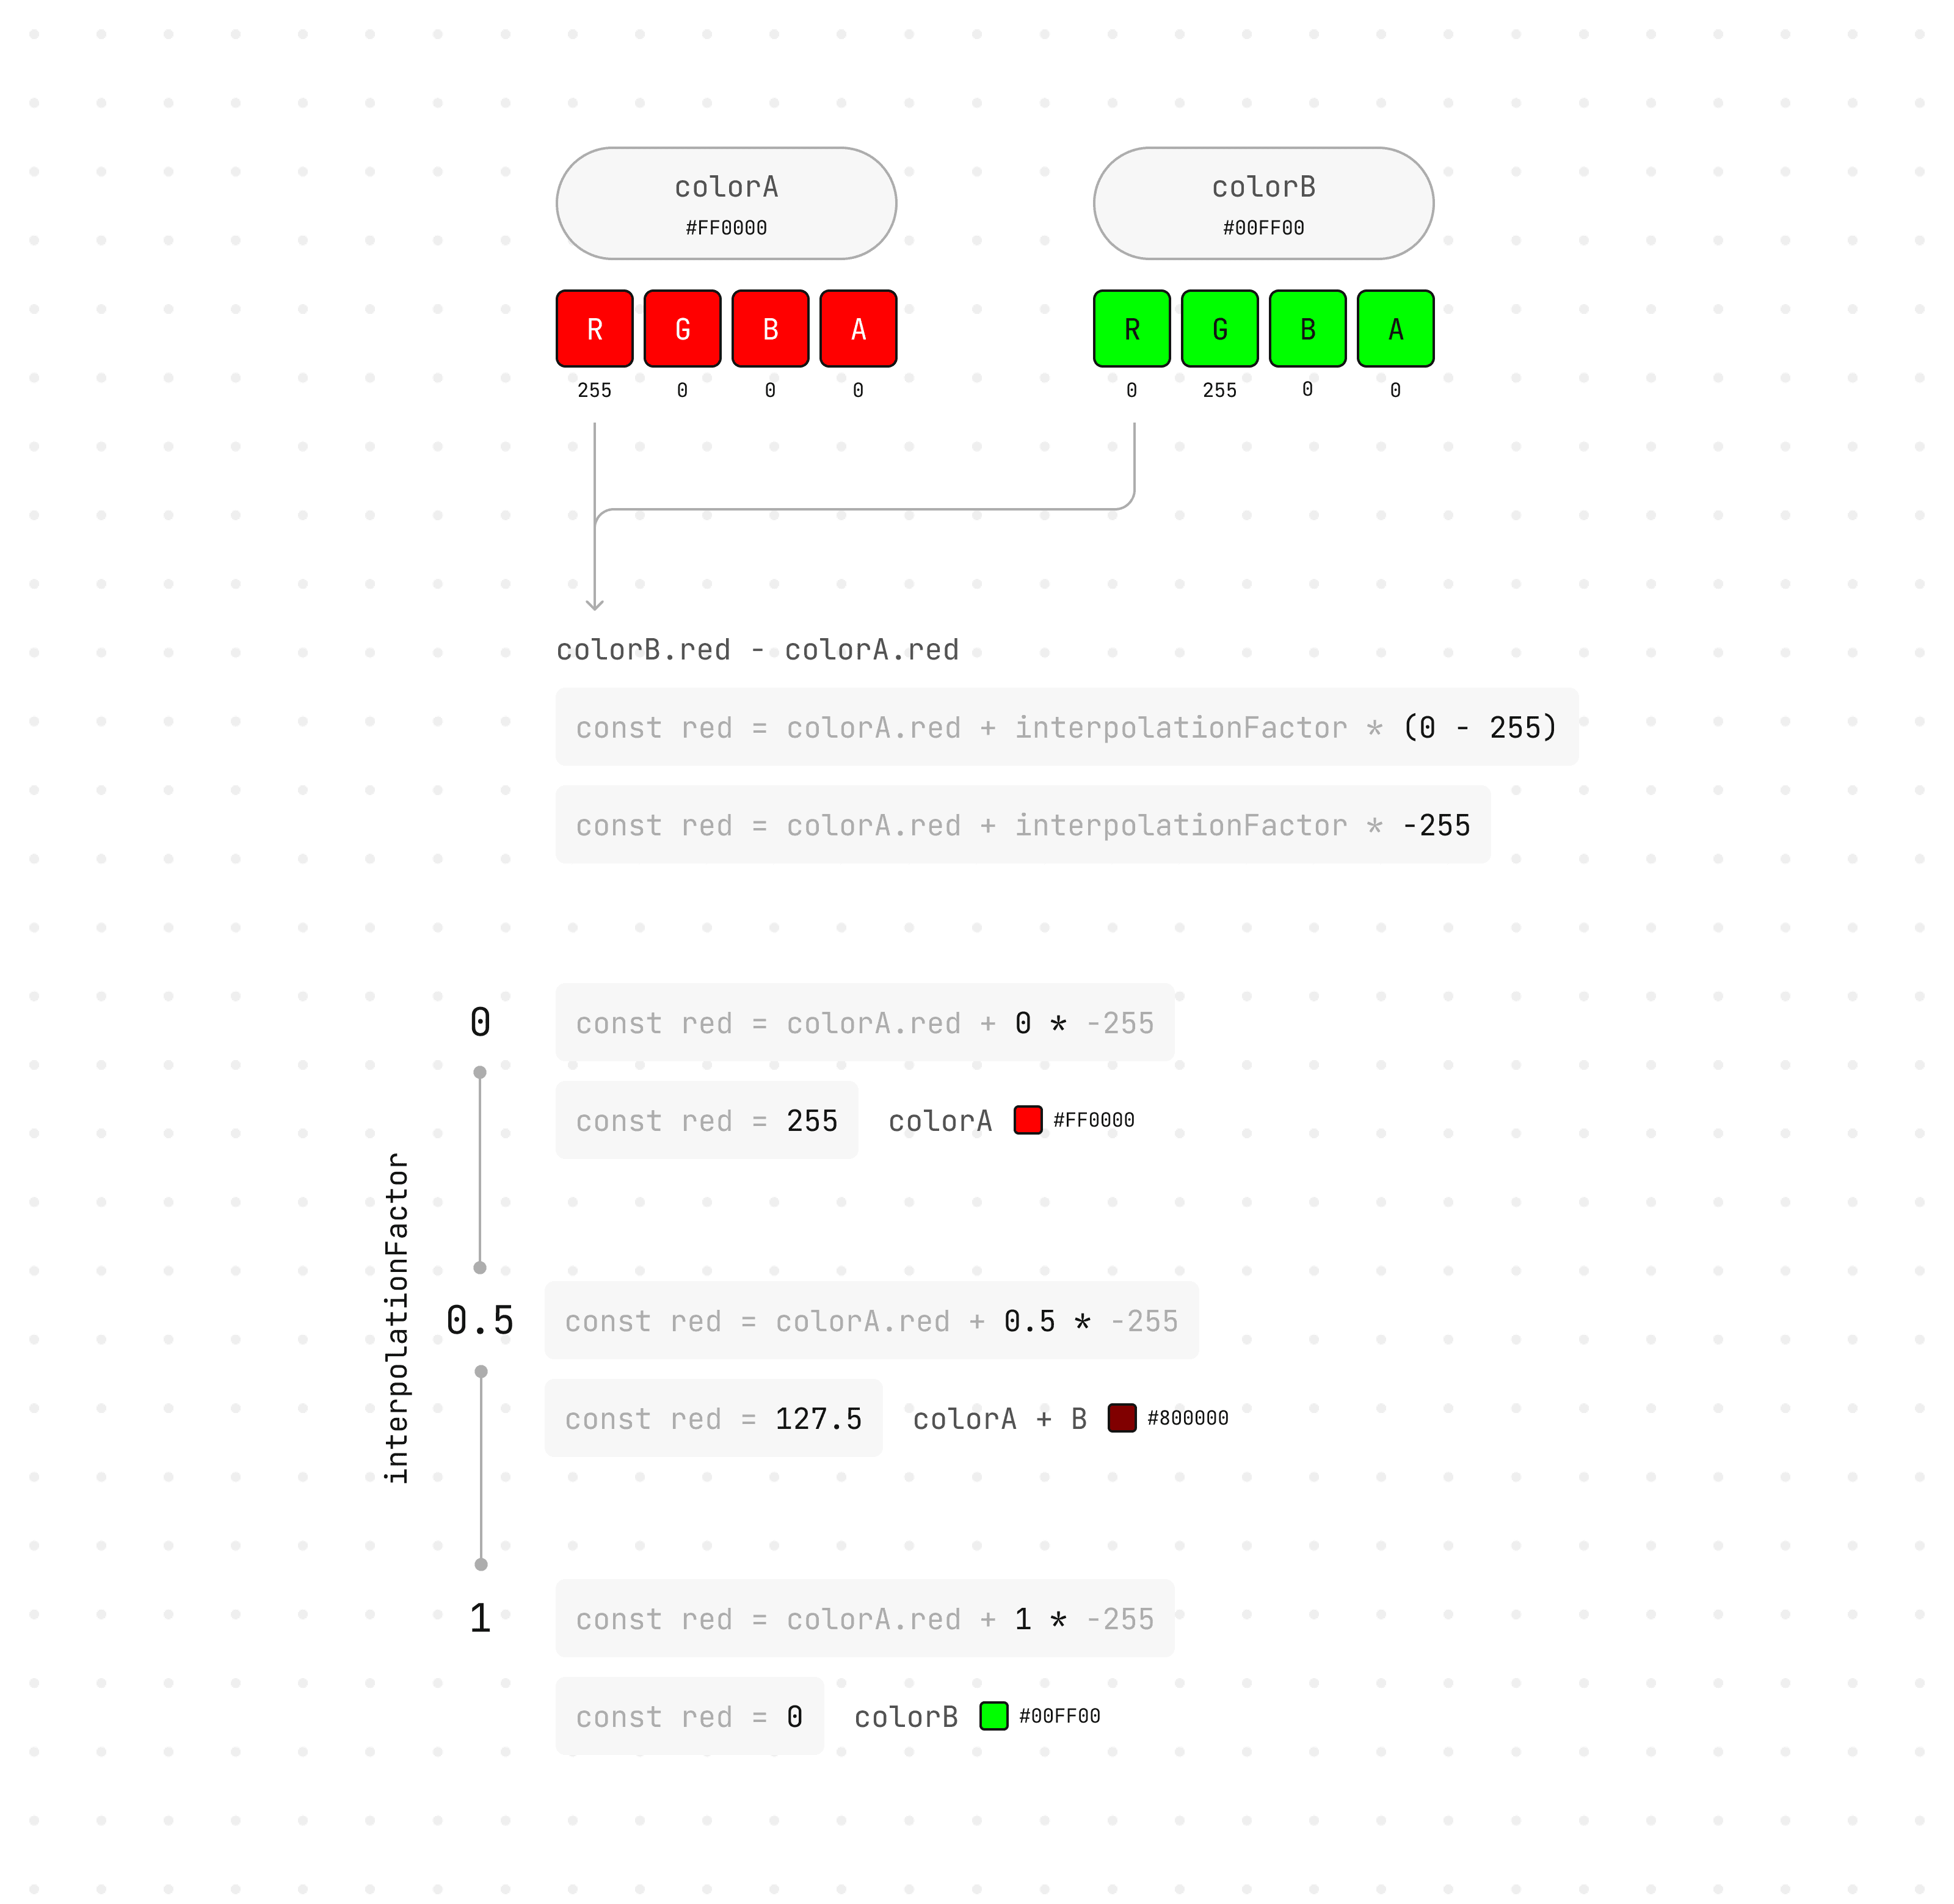
This formula is applied for each of the RGBA components (r, g, b, a). They are then combined into a CSS RGBA color string. Since CSS requires the R, G, B parts to be whole numbers, we use Math.round to achieve this.
X, Y Movement
As your cursor moves around the particle grid, we aim to apply a delicate motion to the entire grid that follows your cursor. To accomplish this, we could normalize the previously calculated dx and dy.
This implies that the offsetX and offsetY values will range between -1 and 1, signifying the relative cursor distance from the particle as a percentage of the window's width and height.
Consider this example for visualization:
We have a webpage with a window width of 1200px and a height of 800px.
A particle is positioned at (600px, 400px) - the exact window center.
The cursor is positioned at (300px, 200px).
The
dxwill be300px - 600px = -300px, and thedywill be200px - 400px = -200px.offsetXwill be-300px / 1200px = -0.25.offsetYwill be-200px / 800px = -0.25.
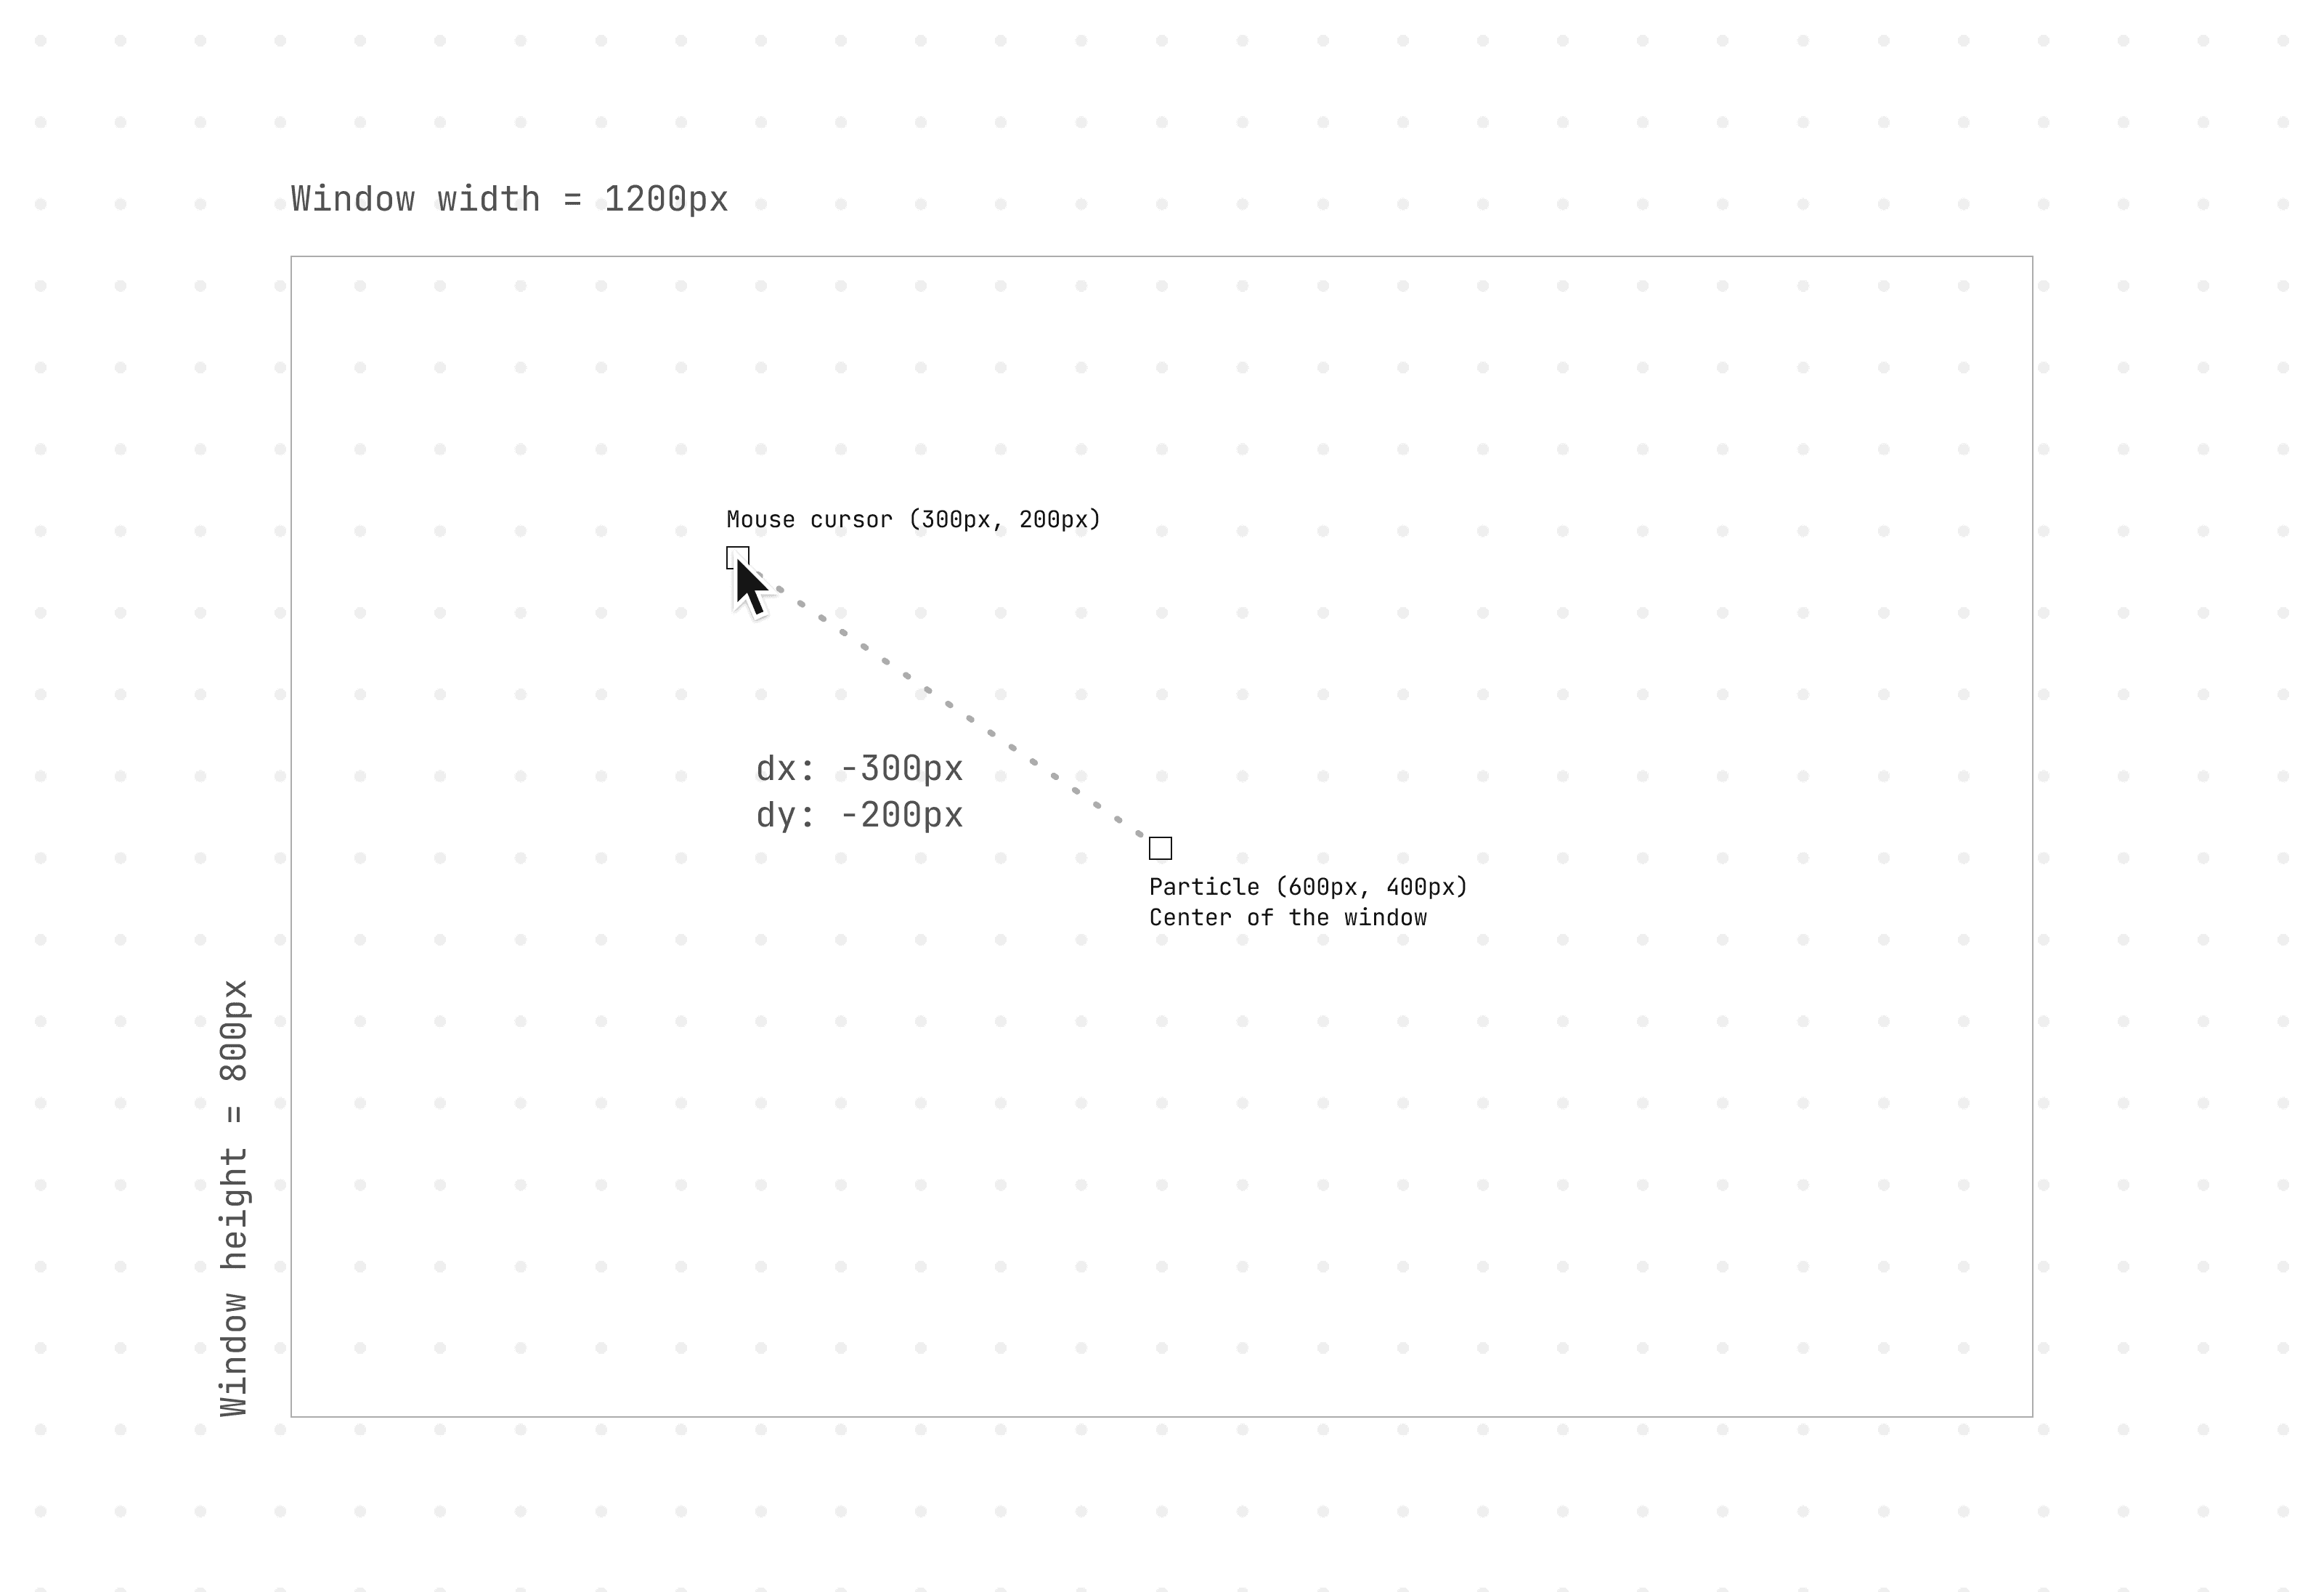
We then use these normalized offsets to animate the particle's x and y positions. The maxOffsetX and maxOffsetY are values you could set via the Framer UI to determine the extent of your particle movements.
If offsetX and offsetY are both -0.25, it indicates that the cursor is located to the particle's left and above it, at 25% of the window's width and height, respectively.
As the cursor moves closer to the particle, these offset values approach 0. If the cursor moves further away, the values approach -1 or 1, based on the movement direction.
The animate property will also be the same for how you define max value for scale and opacity.
05 / 05
Final thoughts
In summary, this component is available for a one-time fee of $9 (My first paid component)! As the active maintainer, I will ensure it is regularly updated. You're welcome to visit the demo at cursor-follow.framer.website to discover the potential of this component.
If you believe it could be a worthwhile addition to your project, buy it!